Hi friends! Sometimes it’s wild how cyclical trends can be. One day you’re wearing all neutrals pretending to be an adult and then next thing you know, it’s 2020 and the biggest craze is tie dye. I’ll be the first to admit, I resisted *hard*. But after a couple months in isolation, begging to give my life any excitement, I’ve jumped on board the tie dye train and I’m ready to tie die everything — old tshirts, bikinis, and even tie dye nails.
So a while ago, I was recovering from a life-threatening illness (long story, I’m sure I’ll tell it one day). I was hospitalized for just under a month, couldn’t move, and lost a ton of weight in the hospital. To treat my illness I had to get major abdominal surgery. Needless to say, by the time I got out I had some body image issues. I wasn’t leaving the house and I didn’t like the way I looked, so fashion and makeup were not really things I found myself interested in. The one thing I could do though was my nails.
I totally threw myself into nail art, teaching myself how to do different designs and exploring my creativity through that medium. It was insanely soothing; a time-consuming task that I didn’t have to spend too much of my limited brainpower on (being in the hospital for a long time makes you very stupid). It made me feel good and I loved doing it!
After a while, I steered away from nail art in favor of more neutral, timeless nail designs. But as I’ve learned, things are cyclical! So here I am, four months deep in isolation with no one to see and nowhere to go, and I figured it was time to try to get with the trends and give myself some tie dye nails. I recorded the process as I was doing it so I could offer up a little tie dye nails tutorial as well. Hopefully it helps!
This post may contain affiliate links, meaning I may receive a small commission if you shop through these links at no extra cost to you. Thank you for supporting me through these links! For more information, check out the disclaimer here.
Here’s how I did my own tie dye nails at home
For this tutorial, I’m using Kiara Sky Gelly Tips so I could give myself the look of acrylic nails at home, and also because I have them on already. I’ll write up a full tutorial on them soon, but in the meantime you can do this technique for any nails! For the record though, I absolutely love them and highly recommend!
I also used gel polish for this. I’ll link all the supplies I used below, but just know you can absolutely do this with regular polish as well, it just might take a little longer for the polish to dry! The supplies I used were mostly amazon finds, and are definitely super affordable, so don’t worry, you can absolutely get this look for cheap at home.
What I used:
× Kiara Sky Gelly Tips Starter Kit*
× MelodySusie UV Nail Lamp
× AIRSEE E-File*
× Carbide and Cuticle Drill Bits*
× This and This Beetles Gel Nail Polish Set
× Nail File and Buffing Block
× Cheap Makeup Sponge
*You don’t need these items unless you’re working with existing nail tips! I have them to help shape my Gelly Tips, but you can absolutely do this with just a hand file, regular polish, and your natural nails.
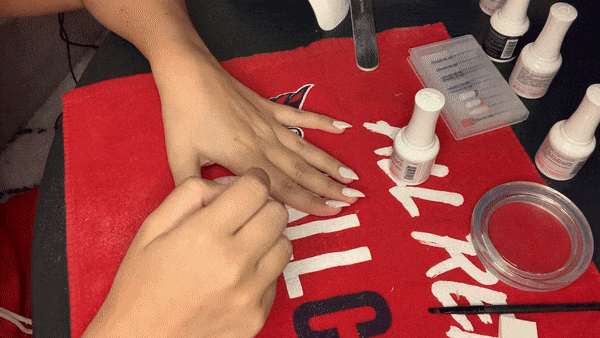
To start, I needed to remove the gel polish from my existing nails and even out the surface. I used a ceramic bit on my e-file to do this easily, but you could definitely do it by soaking your nails in acetone if you have gel polish on already. I also had two nails lift a little, so I decided to remove them and add new Gelly Tips on those nails just for a clean slate.
I followed the instructions in the Gelly Tips kit to add my two new nails, then prepped them for a base coat by lightly buffing the shine away from the surface. I used my hand file to shape the nails in the stiletto shape that I like — I just feel like it’s easier to do it at the beginning. Finally, I cleaned up some bumpy areas near my cuticles with my e-file. If you’re not wearing tips, you shouldn’t need to do this! I just decided to change my polish super quickly, so my nails hadn’t grown out much and I needed to do a little more cuticle work.
If you’re not using nail extensions or tips, and working with unpolished natural nails, you can start here!
With my nails all filed evenly and the surfaces clean, I was ready to lay down my first coat. I used an off-white color I got in this Beetles Gel Nail Polish set, but any white will do. I then cured the white, added another coat, and cured again. If you’re using regular polish, just allow your polish to dry between coats and build until it is mostly opaque. Here’s my favorite regular white nail polish!
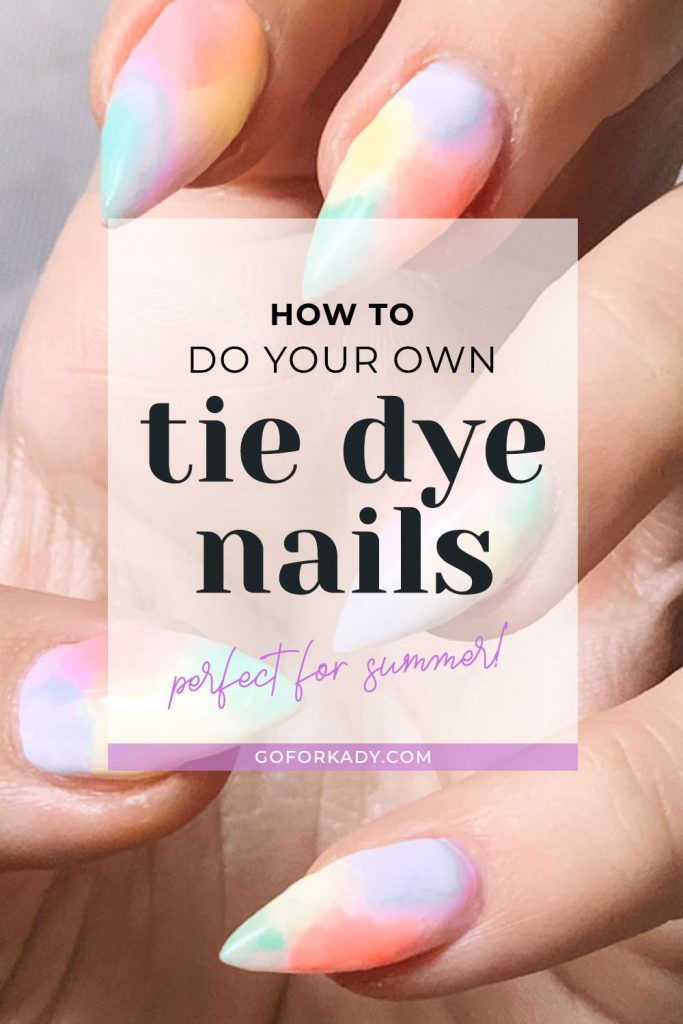
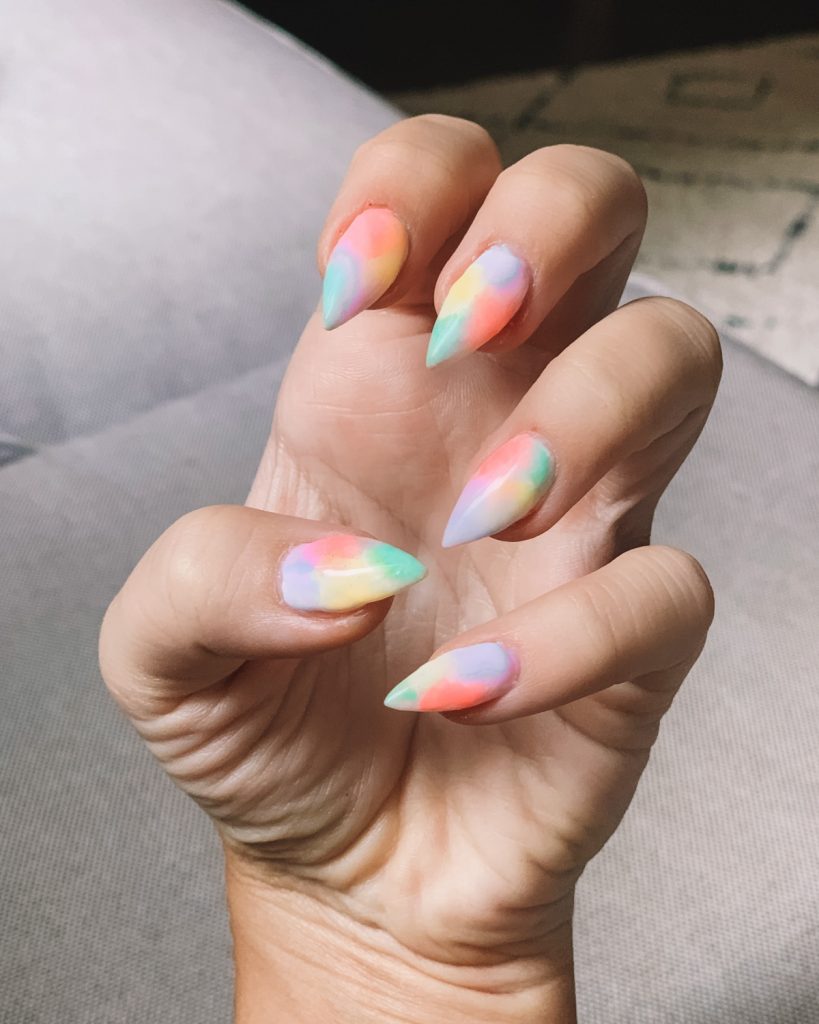
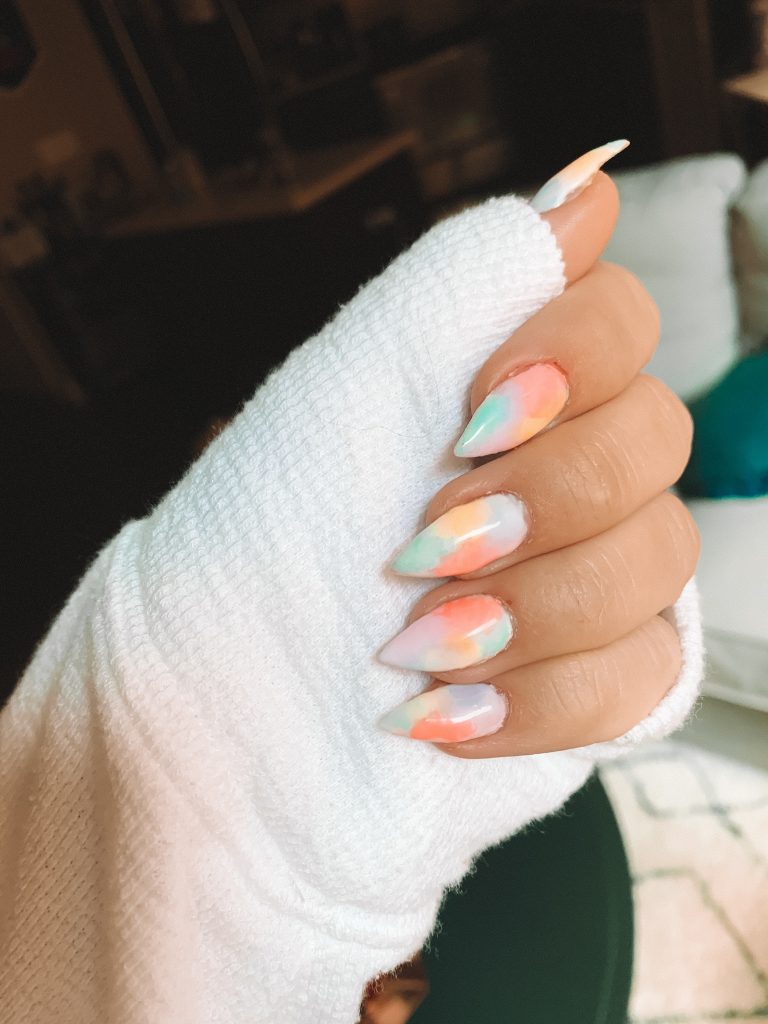
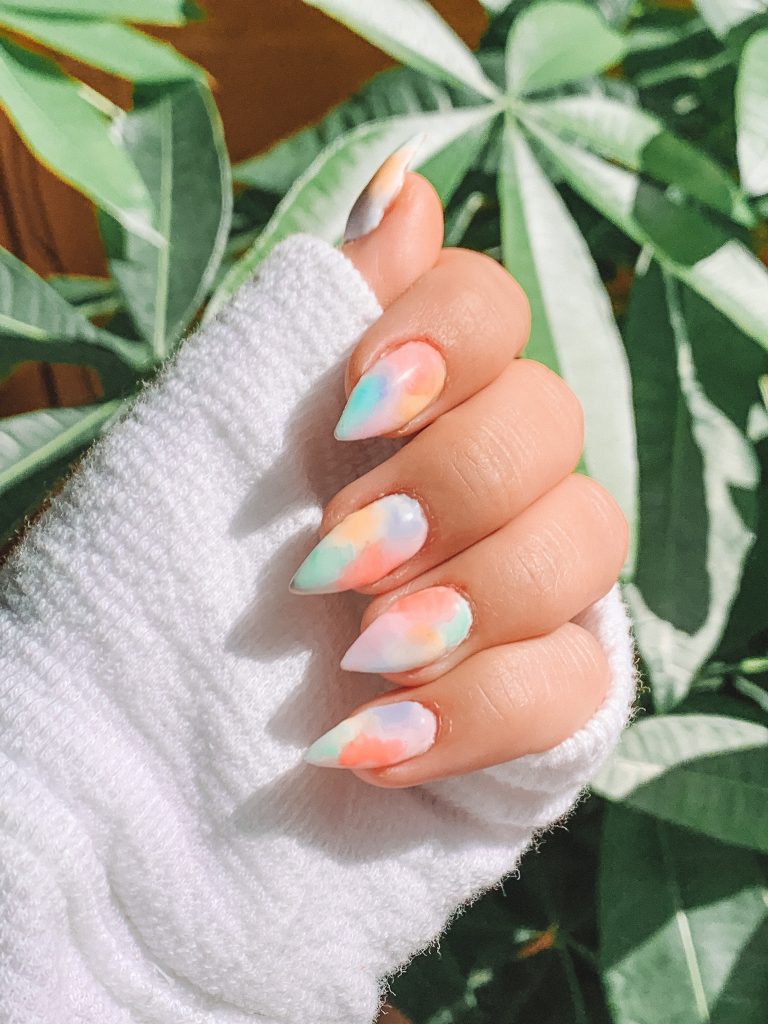
Now, to make these tie dye nails! I used my new tie dye Blackbough swimsuit (shop through my link for 10% off your purchase!) as inspiration and grabbed a handful of colors. I went with a pink, a purple, a blue, a green, and a yellow from this set — all in more pastel shades — but you can use anything you think looks good!
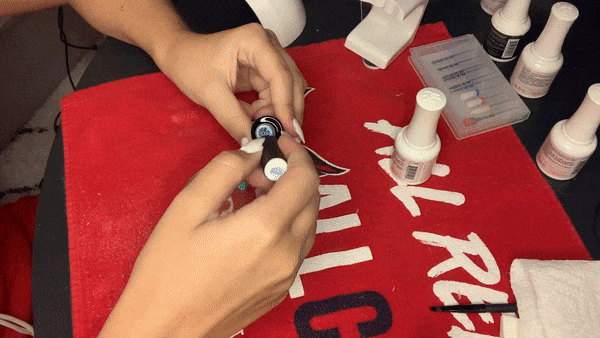
I grabbed a cheap makeup sponge and ripped it up into five pieces. On a smooth surface (I used the lid of a candle lol), I added a bit of each color. The plan is to take a little piece of sponge, dip it into the color, and then dab it on your nail to add a diffused, tie dye effect to your nails.
For some colors, I had to build up quite a few layers to get the color to show up, so I cured my colors in between each layer. As in, I did a bit of purple on every finger, then cured, added another layer, cured again, and then moved on to a different color. I also tried it just adding all the colors at once without curing, and that worked fine too! It definitely helps to blend some of the colors together that way. But if you’re finding that your colors aren’t building enough, give them a second to dry or cure them before you add another layer.

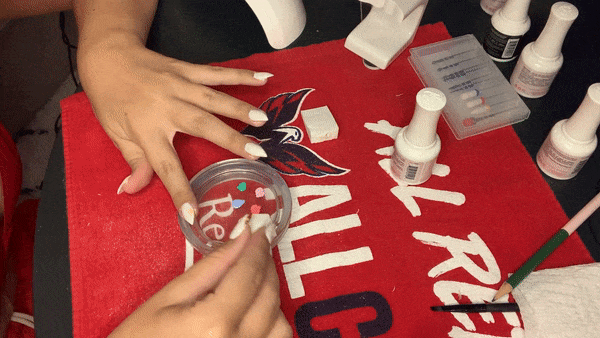
I didn’t have too much of a plan for where I placed my colors, except that I tried to avoid putting colors that obviously clashed (green and pink) right next to each other. I wasn’t entirely successful in this and I still think it turned out fine. Tie dye nails are supposed to look like tie dye clothes — a little bit of a mess, and a whole lot of color. Don’t overthink it! Just add some color where you think it looks good. Pro tip: if you added a little bit too much color, you can use rubbing alcohol or acetone (just be careful with the acetone if you’re using regular polish) on a small brush to help diffuse it a bit.

Continue to build up the color until you’re satisfied. When it’s cured (or dried), add your favorite topcoat. I went with the shiny, no-wipe one that came in the Gelly Tips kit, but I think a matte one would look great too!
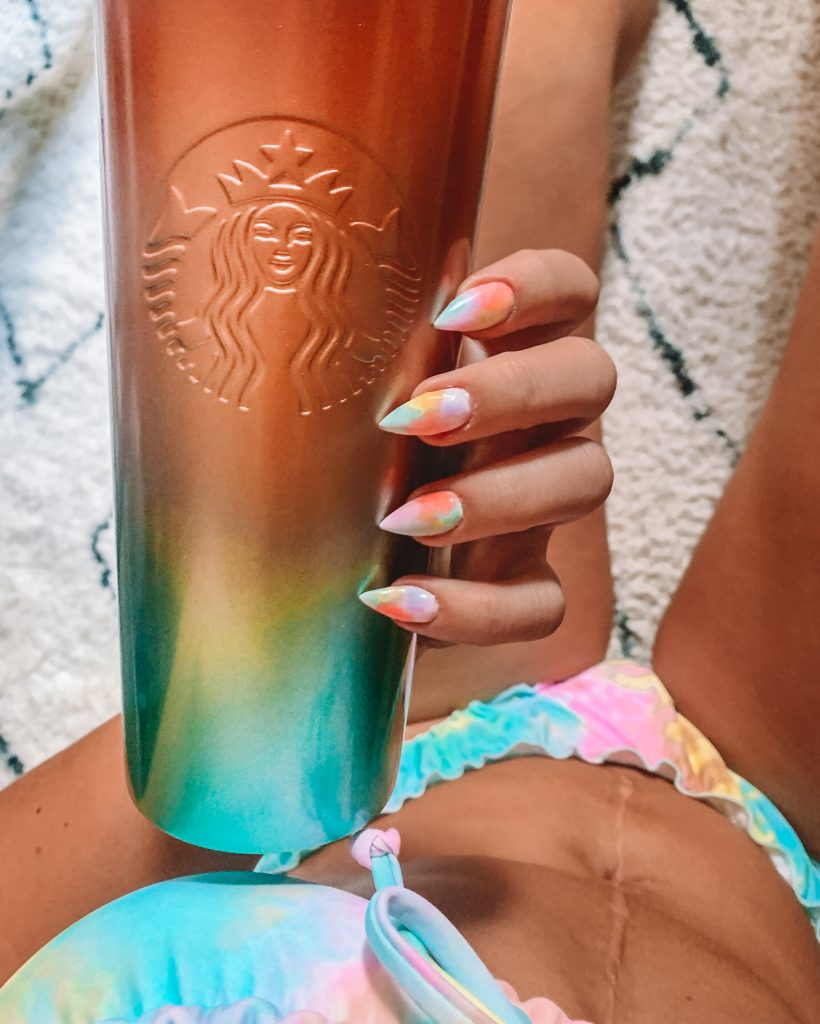
Here are my finished tie dye nails:
It’s honestly that easy to do your own tie dye nails! I love them cause they’re such a good nail trend for 2020, and they’re different without being totally over the top. If you give yourself tie dye nails, leave a comment below or tag me on ig @GoForKady!